To draw a 5/2 air valve, it would be helpful if you have had a moment to visit and read the other pages on this site about drawing air valves. After getting a grounding in drawing the less complex air valves, then moving up to drawing the 5/2 compressed air valve should be pretty easy.If you have not yet had a chance, here are the links to those pages. You may want to review drawing the 2-2 valve, and work your way up to this page on how to draw and 5-2 valve.
As usual with any valve schematic, I would start by drawing a 2″ (or so) square on your paper. If you have been drawing valves right along with reading the other pages, you can probably do this in your sleep by now!
It is always good to use graph paper, and keep your pencil sharp and your eraser handy.

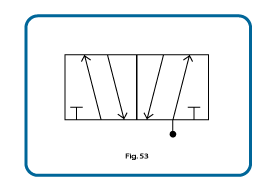
Once you have drawn the basic box, which represents the valve body, you will insert the lines as shown in Fig. 51.
The first number in a valve designation, in this case a five, indicates the number of working air ports a valve will have. The second number, in this case a two, indicates how many positions a valve will have. Therefore, a 5-2 (also can be shown as a 5/3) air valve will have five air ports and two positions.
Fig 51 shows the flow paths of this 5/2 valve when it is in one of its two positions.
Note the supply of air (depicted by the black circle) flowing through the valve to one of the two cylinder ports. The other cylinder port is open to one of the two exhaust ports in the typical 5/2 air valve. On the left, the other exhaust port is blocked.
Each of the two positions of this same valve will be represented by a box like that in Fig. 51, and each will show that same valve in one of its two positions.

Fig. 52 shows the same 5/2 valve but it has now been shifted, and in this second of its two positions, the compressed air flow paths change as shown.
In a 5/2 air valve the supply port never gets shut off. The supply line simply alternates between one cylinder port and the other as the valve is shifted.
With the air in the supply line flowing alternatively from one actuator port to the other port, you can see how this would effectively supply compressed air to a double acting air cylinder or to a double acting rotary actuator.
Each would have two supply ports, and as the valve was shifted, the air would flow to one port allowing the other part to open to the atmosphere to exhaust the air in that side of the actuator.
Each of the cylinder ports has an exhaust port, which would allow the 5/2 air valve to have two exhaust flow controls installed, one in each of the exhaust ports. Each of these flow controls could be controlling the speed of the cylinder in one direction. This is one of the significant benefits of selecting a 5/2 valve over a 4/2 valve body, to allow different speed controls in either stroke of the double acting air actuator.
To finish drawing this one 5/2 air valve, we simply bring the two drawings together in the same schematic as shown in Fig. 53.
When the right side schematic of the valve is in control of the flow paths, the compressed air path will be as shown on the right side of Fig. 53. When this valve is shifted, and the left side schematic is in control, the flow paths will change a shown. The actual valve ports do not change, just the flow of air through the valve does.
It is customary to draw a valve in the position that it will be at rest, which is when the valve in not being acted upon by an exterior actuator or the position that the valve will be in when the air circuit that the valve is part of has stopped.
When an air circuit completes a cycle and stops, one or some of the valves may be deliberately left in an actuated position. The supply line may be drawn on the left in these circumstances. The circuit schematic will show the details for each valve so that others can see that this is the case.
Without the valve actuators being shown in the above valve schematic, and since it is not in an actual valve circuit, you cannot tell where this valve should be when it is at rest. In that case the supply circle is drawn on the right side of the valve schematic.
To complete the schematic of this 5/2 valve, it will need the valve actuators of choice added. There’s a page on how to draw them on this site too!
Additional valve reading:
- Types of Compressed Air Valves – Guide To Pneumatic Valves
- Pneumatic Flow Control Valves – What Are They, How Do They Work?
- Air Compressor Air Line Non-Return valves/Inline (In The Air Line) Air Check Valves Explained
- Check Valve Sizes
- What is Check Valve Cracking Pressure
- Air Compressor Troubleshooting Check Valve
- Air Compressor Unloader Valve Explained
- Unloader Valves On Twin V Piston Compressor Guide
- 5 3 Valves Explained
- 5-2 Air Valves
- 4-2 Compressed Air Valves
- 3-2 Air Valves
- Drawing a 5/3 compressed air valve
- Pneumatic Soft Start Valves
- Solenoid Pilot Air Valves
- Compressed Air Solenoid Valve Guide
- Air Compressor Auto Drain Valves Guide
- Needle Valve vs Ball Valve
- Globe Valve vs Ball Valve
- Globe Valve vs Gate Valve
- Butterfly Valve vs Gate Valve
New comment? New question? Please add it here along with photos to help others help you with your compressor and equipment problem!