Replacing your air compressor pressure switch might feel intimidating. After all, the pressure switch is ultimately the “brain” of your air compressor. But believe me when I say it’s not brain surgery!
Here’s a step-by-step on how to replace the pressure switch on your air compressor. Specific steps may vary by make and model, but this is a starting point procedure for removing and reinstalling any air compressor pressure switch.
Table of Contents
- Removing the Old Pressure Switch
- Replacing an Air Compressor Pressure Switch
- Installing a New Air Compressor Pressure Switch
- YouTube Video Tutorials
Removing the Old Pressure Switch
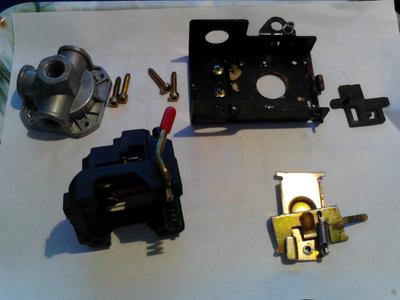
This is what the compressor pressure switch will look like when it’s disassembled. Before starting, wear work gloves to protect your hands. You can then follow these steps on how to remove a pressure switch!
Replacing an Air Compressor Pressure Switch
Step 1 Turn Off the Power
The first step would be to unplug the air compressor’s power cord from the wall outlet so that the electricity is shut off.
Here’s a picture of the air compressor pressure switch installed on the tank before it’s removed.
Step 2 Drain the Air Tank
It’s important to ensure your air compressor is empty of pressurized air before replacing the pressure switch. To do this, pull the ring on the safety valve to drain all the pressurized air from the air tank.
Step 3 Remove the Manifold Cover
To remove the manifold cover simply remove the retaining screw and lift it away from the unit.
Step 4 Remove the Tank Pressure Gauge
Now that the manifold cover is lifted away, you can remove the tank pressure gauge from the air compressor pressure switch by unscrewing it using a wrench to loosen it and then pulling it away from the manifold.
Step 5 Remove the Pressure Switch Tube
Use a spanner to unscrew the pressure switch tube fittings from the check valve and the pressure switch.
Step 6 Remove the Pressure Regulator Assembly
The pressure regulator assembly can be unscrewed with ease and then removed from the pressure switch.
Step 7 Remove the Pressure Switch Cover
Here’s a close look at the Air Compressor Pressure Switch Terminals once the cover has been removed. Now we can remove the two sets of wires from the pressure switch.
Step 8 Remove the Pressure Switch Wires
Before doing anything, take a photo of the wires connected to your pressure switch to help you reconnect the two sets of wires with your replacement pressure switch.
One set feeds into the pressure switch from the motor and the other set feeds into the switch from the supply (cord plugged into the wall socket). Each set contains one black, one white, and one green wire.
NOTE: in this pressure switch, both black wires are on one side and both white are on the other so as the switch works, alternatively, the black or the white wires will be live. The green wires are the ground wires and must always be attached to a metal part of the pressure switch. Other switches may work differently, so you will need to read the terminal mounts to see what wire goes where.
Given that your pressure switch is similar to that presented above, use a screwdriver to unscrew the screws holding the wires in place and:
- Disconnect the 2 black wires from the pressure switch
- Disconnect the 2 white wires from the pressure switch
- Disconnect the 2 green wires from the pressure switch
Part of removing the wires from the old pressure switch will involve disassembling the strain relief fittings. These strain relief fittings hold the wires in place securely to help prevent a disconnect if either wire is being pulled on aggressively.
In most cases, there will be a plastic nut inside the pressure switch housing that must be removed.
Step 9 Remove the Strain Relief Fittings
Now that the two sets of wires have been disconnected, you will be able to see the rest of the strain relief fittings on both sets.
Remove the rest of the strain relief fittings from the two-wire sets, this is because you will have obtained a replacement pressure switch that has integral strain relief fittings.
Step 10 Remove the Safety Valve
Simply unscrew the safety valve and remove it from the pressure switch assembly.
Step 11 Disconnect the Pressure Switch
Final step! All you need to do now is unscrew the pressure switch assembly from the pipe connected to the tank and remove it from the air compressor system.
Installing a New Air Compressor Pressure Switch
Now follow these steps on how to install a pressure switch!
Step 1 Prepare the Tank Pipe
Either apply thread sealing tape or pipe dope to the tank pipe. This is complete to your preference, just ensure that no tape or pipe dope is allowed to sit inside the air path as it might get blown into a sensitive area of the system and cause problems somewhere along the line.
Step 2 Connect New Pressure Switch
Screw the new pressure switch onto the tank pipe securely. Do not tighten too much as this can crack the sealing tape or pipe dope.
Step 3: Align the New Pressure Switch
When tightening the pressure switch, align the check valve tube fitting.
An ideal position is having the switch manifold ports come to rest facing the front handle of the air compressor so that the unloader valve attachment port will be in the middle, and the two strain relief fittings will be on the pump side of the air compressor.
Step 4: Prepare the Safety Valve
Again, either apply thread-sealing tape or pipe dope to the threads of the safety valve.
Step 5: Screw the Safety Valve
You can now screw the safety valve into the new pressure switch and tighten it firmly. Please be careful again, so as to not tighten it too much as this can crack the sealing tape or pipe dope.
Step 6: Remove the Pressure Switch Cover
Remove the cover from the new pressure switch so you’re then able to connect the wires.
Step 7: Connect the Wires
Pull up the photo I asked you to take earlier and use this as a reference in connecting the wires to the new pressure switch.
Hopefully, the photo is enough guidance to help you but if not, here is some additional guidance…
As I have already told you, there are two sets of wires that need connecting to the switch. One set from the motor and one from the power core, both consisting of black, white, and green wire.
Read the terminal mounts on the pressure switch to know what wire goes where. The terminals will typically be marked motor or load and that is where the set of wires coming from the compressor should be attached. The other wire terminals may be marked supply or power and that is where the set of wires coming from the power cord should be attached.
In most cases, there should be two circuits, one with two black wires and one with two white wires depending on whether the switch is tripped or not. So, align the black wires on one side of the switch and the white wires on the other side.
The ground (green) wire attaches to the ground screw. This is easy to locate as you look for the electrical symbol for ground or earth that will be visible on the switch like the one below.

One green wire will be from the motor set and one from the power cord set… It doesn’t matter which ground wire is attached to which side, as long as they’re both attached you will face no problems.
Step 8: Reinstall Pressure Switch Cover
Now that the wiring is complete, you can reinstall the pressure switch cover.
Step 9: Prepare the Pressure Regulator
Apply your choice of thread-sealing tape or pipe dope to the pressure regulator connecting pipe threads.
Step 10: Reinstall the Pressure Regulator
Screw the pressure regulator and pipe into the new pressure switch. Have the tank gauge fitting facing up and tighten firmly (again not too tight due to the thread-sealing tape/pipe dope).
Step 11: Reinstall the Pressure Switch Tube
You can now reconnect the pressure switch tube to the check valve and the new pressure switch using a spanner.
Ensure to tighten these fittings firmly.
Step 12: Reinstall the Tank Pressure Gauge
Screw the tank pressure gauge onto the new pressure switch ensuring it is tightened securely.
Step 13: Restore the Power
Plug the air compressor into the electrical outlet so that the power is restored and you’re able to start up the compressor.
And… Success! You have now removed your old pressure switch and replaced it with a new one.
A short video below from Sears PartsDirect shows how to replace a broken pressure switch in an air compressor.
If you wish to learn how to adjust air compressor pressure switch control valve, visit our detailed page for more information!
YouTube Video Tutorials
I have picked out a couple of YouTube demonstrations on replacing an air compressor pressure switch:
If you have any questions regarding replacing a pressure switch, please leave a comment below, with a photo if applicable, so that someone can help you!