Hey! This site is reader-supported and we earn commissions if you purchase products from retailers after clicking on a link from our site.
When you have an air compressor regulator not working, the task of air compressor regulator repair can offer its own challenges, for sure. It’s easy to immediately think of buying an air compressor regulator replacement, but, if you know the air compressor regulator troubleshooting and repair steps that are presented in this article, you could save yourself some money!
I am very happy to extend from all of us, a massive thanks to Ed Parks for these instructions on air compressor regulator repair. It is very kind of him to take the time to put this down and send it in for inclusion on this website. Here is Ed’s step-by-step guide.
Table of Contents
- Step-by-Step Guide for Air Compressor Regulator Repair
- YouTube Demonstrations
- FAQs (Frequently Asked Questions)
- Reader Comments & Responses
Step-by-Step Guide for Air Compressor Regulator Repair
- Confirm the diagnosis of a broken air pressure regulator
- Keep some pressure in the tank and prepare for disassembly
- Make sure the compressor is unplugged
- Release all of the pressure from the tank
- Remove screws holding the cowling/compressor cover
- Lay cover to one the side don’t disconnect wires
- Remove the air pressure regulator with a wrench
- Remove the air compressor regulator knob
- Remove the pressure regulator knob control piston
- Remove the piston spring from inside the air regulator knob
- Twist the air regulator knob to prepare for reassembly
- Apply lubricant to the cylinder walls
- Reassemble the air pressure regulator knob
- Unscrew the brass tank pressure seal assembly
- Clean the pressure regulator manifold
- Clean the spring and rubber seat
- Grind the rubber seat
- Review the rubber seat
- Reassemble the rubber seat, spring, and brass tank pressure seal assembly
- Reassemble and tighten the brass assembly into the manifold
- Reassemble the regulator control knob assembly
- Reassemble the plastic cover onto the compressor
Below are the detailed step-by-step instructions for your air compressor regulator repair, for an air compressor regulator that does not allow adequate air pressure to come out of the air hose. Before going forth, if you wish to learn more about air compressor regulators, their principles, and their types, then you should visit our guide!
1. Confirm the Diagnosis of a Broken Air Pressure Regulator
When the air compressor tank has plenty of air but you only get a short burst of air pressure (only momentarily) out of the air hose, and the compressor’s air hose gauge goes to zero – the compressor regulator is likely faulty.
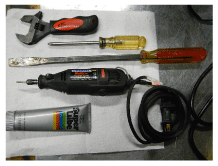
2. Keep Some Pressure in the Tank and Prepare for Disassembly
Be sure the tank is not empty and has some pressure. Turn Regulator Control Knob counter-clockwise all the way and release all pressure from the air hose connector. The air pressure in the tank forces the Control Knob’s plastic piston to move back into the Control Knob/Regulator’s housing, thus preventing damage to the plastic piston when disassembling.
3. Make Sure the Compressor is Unplugged
Safety first! Ensure you unplug the compressor, as we will be dealing with some exposed wiring.
4. Release All of the Pressure from the Tank
Now release all air pressure from the tank using the water drain valve on the bottom of the tank.
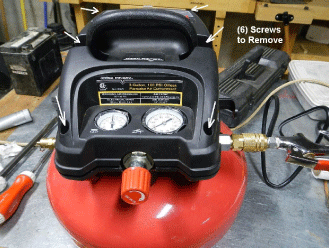
5 – Remove Screws Holding the Cowling/Compressor cover
Remove (6) screws holding the top half of the plastic compressor cover on: (2) from the handle and (1) at each corner of the plastic housing cover. The (2) screws in the handle are Machine Screws 10-32 x 1″ Phillips and most likely will strip when reassembled – replace with 10-32 x 1 1/4″ Phillips.

6. Lay the Cover to One Side Don’t Disconnect the Wires
Lay the top half of the plastic cover over to the side – no need to disconnect any wires.
7. Remove Air Pressure Regulator with a Wrench
Remove the air pressure regulator by using Crescent Wrench and turning the hex nut counter-clockwise. Will be tight but be gentle so as not to damage the o-ring seal. There will be just enough room to get the wrench on at an angle with the bottom plastic housing still in place when the Control Knob is completely screwed out.
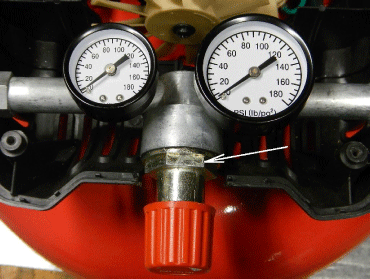
8. Remove Air Compressor Regulator Knob
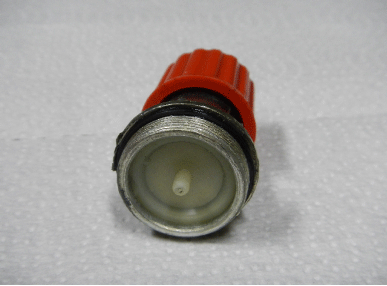
Regulator Control Knob removed.
9. Remove the Pressure Regulator Knob Control Piston
Turn the red Control Knob clockwise, and the plastic piston with the post in the middle (in above picture 5) will be pushed out.
10. Remove the Piston Spring from Inside Air Regulator Knob
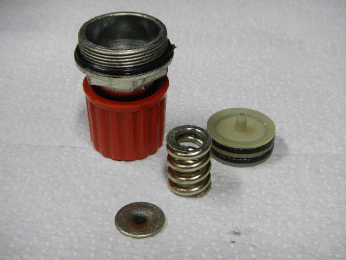
Remove the plastic piston, compression spring, and metal disk from the Control Knob housing and clean all parts with a paper towel or rag; don’t use anything in the housing that will scratch the inner wall of the cylinder, but clean out any corrosion. Do not remove the (2) o-rings from the plastic piston unless you plan to replace them.
11. Twist the Air Regulator Knob to Prepare for Reassembly
Turn the red Control Knob counter-clockwise again to screw the knob out for reassembling.
12. Apply Lubricant to Cylinder Walls
Apply a thin film of lubricant (I would not recommend grease as it will gum up with time) – Teflon or Silicon lubricant or O-ring grease to the cylinder walls of the control knob’s housing, to the metal disk, and to the O-rings.
13. Reassemble the Air Pressure Regulator Knob
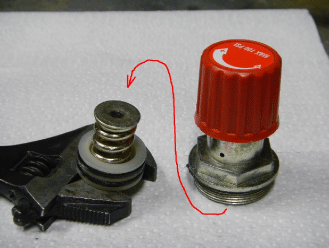
Reassemble the above parts. Be sure the metal disk’s cupped side is facing the bottom/inside of the Control Knob. It is easier to get these parts reassembled if you hold the parts as pictured below (on the crescent wrench) in your hand and place the Control Knob on top of them, pressing them into the Control Knob housing carefully so as not to damage the O-rings.
Press in until completely seated like in picture 5. Sit reassembled Control Knob aside until final assembly.
14. Unscrew Brass Tank Pressure Seal Assembly
With a large flat screwdriver unscrew the brass tank pressure seal assembly. Do not remove the o-ring unless you plan on replacing it.

15. Clean Pressure Regulator Manifold
Clean the inside of the manifold with a paper towel or rag.

16. Clean the Spring and Rubber Seat
The part causing the problem is the rubber Tank Pressure Seat. Carefully remove the spring with its rubber seat, and clean both parts. Due to the type of material, from pressure and moisture, the rubber has swelled to the extent that an adequate amount of air cannot pass around the sides of the rubber seat. No need to remove the rubber seat from the compression spring.

17. Grind the Rubber Seat
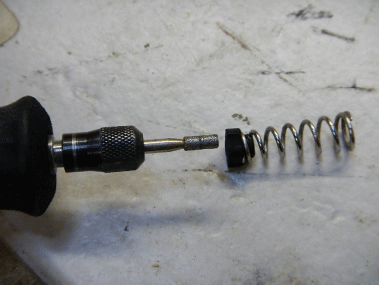
Using a Dremel with a 1/8″ round carbide bit, carefully grind a notch into the (4) sides (the center of the sides only, not the corners) of the rubber seat. Be very careful not to grind too deep.
Upon close inspection of the sealing surface of the rubber seat, you’ll notice a circular groove that makes contact with the sealing/mating surface inside of the brass threaded hex bushing.
Be sure to not grind anywhere close to this sealing groove in the rubber or your tank will no longer hold pressure when stored. Do Not Grind on the corners at all; the corners keep the rubber seat in place and aligned in the brass hex bushing.
18. Review the Rubber Seat
Notice depth of the notches is just enough to create a gap for air to come around the rubber when it is reassembled in the brass threaded hex bushing.
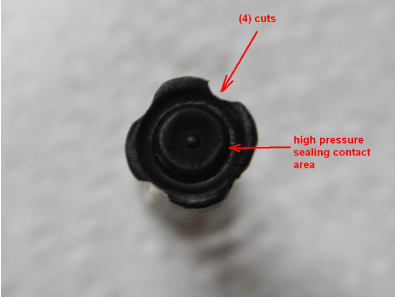
19. Reassemble the Rubber Seat, Spring, and Brass Tank Pressure Seal Assembly
Apply a very thin film of Teflon or Silicon lube or o-ring grease to the rubber and reassemble into brass threaded hex bushing.

20. Reassemble and Tighten the Brass Assembly into the Manifold
Apply a light coating of lubricant to the o-ring and screw the brass assembly into the manifold. Just tighten snugly – no need to overly tighten O-ring seals – just good and snug (too tight will cut o-ring).
21. Reassemble Regulator Control Knob Assembly
Apply a coating of lubricant to the Regulator Control Knob assembly’s o-ring and also to its mating surface of the manifold. This o-ring will be fairly easy to cut if not careful. Reassemble Regulator Control Knob assembly into the manifold, again tighten snugly, but don’t overdo it.
22 – Reassemble the Plastic Cover onto the Compressor
Reassemble the top half of the plastic cover to the compressor. This fix will now allow an adequate amount of air to pass around the rubber seat that had swelled over time.
If someone can locate a part number and a source for a new rubber seat please post it on the parts needed page, and refer to this page too, if you would.
YouTube Demonstrations
Alternatively, to the step-by-step guide presented in this article, I always find YouTube a great source of help when it comes to any repair or troubleshooting task. Whether these approaches will work for you or not is down to you to find out! Nevertheless, I’ve picked out these two useful YouTube demonstrations!
If you’re trying to fix your air compressor, or you’re wondering how to fix an air compressor problem that you’re having – check out my air compressor troubleshooting page for a detailed list of common air compressor problems and links to handy guides on how to solve your air compressor problems!
Of course, you can also always outsource your air compressor repair – click here for some air compressor repair shops near you.
FAQs (Frequently Asked Questions)
It is possible to repair a compressor pressure regulator, but depending on the extent of the damage it may not be worth the effort. If the regulator is only slightly damaged, it will be possible to clean and inspect all parts for wear or damage, along with replacing any damaged parts and adjusting the spring tension. However, if the damage is more severe, replacing the entire pressure regulator may be more cost-effective if the damage is more severe. In some cases, replacing the compressor pressure regulator is the best option because they are inexpensive.
A good way to test a pressure regulator is by first adjusting the pressure regulator to approximately 80% of the inlet pressure showing on the receiver side of the shut-off valve. The regulated air pressure will be shown on the regulator pressure gauge. During operation, observe the regulator to see whether it compensates for changes in flow while still maintaining the regulated pressure at 80% of inlet pressure.
Your regulator could be leaking air for a number of reasons. The most common reason is the diaphragm inside the regulator cracking which leads to leaks. When the diaphragm cracks, the air is able to flow through it, up the regulator housing, and out of the relieving hole or flow out from under the adjustment knob.
Reader Comments & Responses
Comment
Thank you so much for your repair instructions about how to fix a regulator. Now my Central Pneumatic 3-gallon pancake air compressor, model 95275, from Harbor Freight is working again. Yippee! I didn’t have the proper lubricant, so all I did was disassemble it, and used my Dremel to shave off bits of the rubber Tank Pressure Seat, as you showed.
I wasn’t sure what you meant about the “corners”, since it was perfectly round, but I just shaved off a little from the four points of a cross, reassembled it, and now it releases air again. Before, it would only do one brief puff of air, and then the regulator pressure gauge would bottom out at zero, and have no more pressure, even though the tank was fully pressurized.
Note added: I didn’t have a screwdriver big enough to remove the Tank Pressure Seal, but a socket wrench worked very well. Putting it together, I just needed to push down on the head of the Tank Pressure Seal to compress the spring and start threading it in a little by hand, and then I could use the socket wrench to tighten it the rest of the way.
Fixed now, thanks to you! You have a very informative site, and I greatly appreciate your work.
Response
Well, Dave, the originator of these instructions was Ed Parks, and we would very much like to send him your comment but have no way of reaching him. I hope he reads your kind words. Cheers!
If you have any questions regarding air compressor regulator repair, please leave a comment below, with a photo if applicable, so that someone can help you!


