Hey! This site is reader-supported and we earn commissions if you purchase products from retailers after clicking on a link from our site.
Need to connect an air line? The process seems to puzzle some folks, and I have had a number of questions about it so I thought a page detailing how to connect an air line might be in order.
There are a vast number of air compressors, air compressor models, and compressor shapes and sizes out in Do It Yourself Land. Yet all have similarities in plumbing that should make the advice on these pages useful to you.
For even more information (shameless plug alert) buy a copy of my e-Book The Home Compressor, which has chapters providing detailed information about how to connect up compressors, air tools, hoses etc., along with much more info on compressors. The link is in the navigation column to the right.
Table of Contents
Connect An Air Line To A Discharge Coupler
The air that is in your compressor tank has to get out of that air tank and to your air tools to allow you to do some work.
The air tool might be a simple blow gun, air stapler, air brad nailer, or any of a myriad of air-driven, toys for big boys and girls that you can find gracing the shelves of your DIY stores these days. Regardless of the air tool type, the compressed air has to get to it.
The compressed air is prevented from flowing out of your compressor tank all the time by the discharge coupler threaded onto the end of the discharge pipe from the compressor.
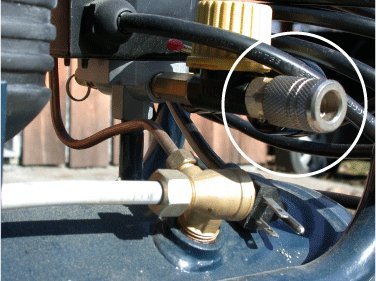
In the photo the white circle is surrounding the discharge coupler installed on a small home compressor.
The air line to your discharge coupler from the tank may not look like that in the photo above, yet I assure you that the line from your tank in a typical DIY type air compressor will end in a coupler similar to that shown in the photo.
Air Coupler is Checked!
This coupler is checked, meaning that as long as a connector is not inserted into it, air cannot escape from the compressor tank through the coupler itself.
There is much more information about air couplers in general on the couplers page on this site. I recommend you read this page for a complete understanding of couplers before proceeding further on how to connect an air line.
Connect An Air Line With An Air Connector
In order to get compressed air flowing from your compressor to your air tool, you need to insert something into the discharge coupler. This something opens the internal ball-check inside the coupler and allows air to flow.
The something you insert into the coupler is the air connector, typically found either on the end of an air line, or in the supply port of an air tool.
Understand more about air connectors on the connectors page on this site.
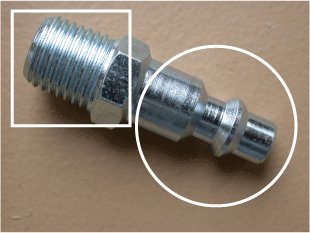
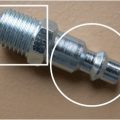
In this photo the part of the connector that has been circled is the part that inserts into the coupler. Inserting the connector can be easy, or very challenging, depending on whether they are properly matched.
Sometimes it’s necessary to slide the knurled ring on the coupler back as you insert the connector. Let go of the knurled ring before you let go of the connector so that the locking mechanism engages first. Otherwise, your connector can just blow back out of the coupler.
This is a male NPT connector, and the part in the square box is the male thread to be threaded into the tool port, maybe a valve port, anywhere that you want the compressed air to flow when the connector is inserted into the coupler.
More than a few folks have asked questions about the process of connecting their air compressor to their air tool or air using application. These pages are in response to those questions.
Air Line Connector
In this photo the white circle surrounds the part of the connector that inserts into the coupler.
The part of the connector that is surrounded by the white square is the method of connecting that connector to something.
The connector that inserts into the coupler on the air compressor itself is commonly attached to the air hose or an air line. In the photo, this is a male NPT thread inside the box. Your hose might also have a male NPT thread end, so you would either have to use a threaded female/female coupling to attach the connector to the hose, or you might opt for a female connector instead. The female connector would screw right onto the male thread of the air hose.
At the other end of the air hose or air line you would install another checked coupler, so that when the connector was inserted into the coupler on the compressor, air would flow down the air line, and then stop at the coupler.
Compressed air would not flow out of the end-of-hose coupler until a connector was inserted. And the connector inserted there would be commonly attached to an air tool.
This connector thread would also screw into the air supply port of your air tools. Each of your air tools would have a connector pre-installed, so when you wished to change air tools, you simply would slide the ring back on the coupler, out would pop the connector, and you would insert the connector attached to a different air tool.
Connector Thread Size
You would need to make sure that the connector thread was the same thread size as the port in your air tool. If you are not quite sure about what that means see the NPT and Metric fittings pages on this site.
Connector Types
Along with making sure that the connector thread is the same size as the port into which you try to thread it, you have to make sure also that the part of the connector that is circled in white is the same make and style of the coupler into which you try to insert it.
It is easy to become confused, and few things are as frustrating as trying to insert a connector into a coupler that it is not a mating pair for. Sometimes, a mismatched coupler and connector may actually connect. The result can be lower air flow and ongoing leaking.
There are varying qualities of connectors and couplers (the cheaper ones tend to leak if there’s even a bit of side-load) yet for us DIY users, cheap ones are usually OK.
My advice is to find out when you buy your compressor what type of coupler and connector comes with the kit, and purchase a bunch more of that same type at that same time, and don’t ever have any other brand around in the shop or tool box.
As a general rule you will need many more connectors that you will couplers. I have a connector threaded into everyone of my air tools so that I don’t have to go looking for one when I want to use another tool.
Putting The Air Line Connection Together
You’ve got a discharge coupler on your air compressor.
You have an air tool with the correct connector threaded into the air tool air intake port.
How do you connect the discharge coupler on your compressor to the air tool?
You will use an air tube or air hose. Since the difference between the two is well documented on this website, visit information about air line hose and air tube on their pages on this site.
Into one end of your air hose you will install an air connector, and into the other and air coupler.
The connector on the air hose inserts into the discharge coupler on your air compressor.
The connector that you have already inserted into your air tool(s) can then be inserted into the coupling on the other end of the air hose.
The coupler on the air hose is checked. Air can flow into the hose, but unless a mating connector is inserted into the coupler, no air can flow out through it.
And that folks is how you connect an air line from the compressor to your air-using application.
Want more on Connect An Air Line?
Please add you comment here along with photos to help others help you with your compressor and equipment problem!
Related Help Articles:
 How to Fix a Leaky Air Compressor Hose – Stop Air Compressor Hose Leaking
 How to Choose an Air Compressor – Buying Air Compressors 2023
 Compressed Air Leaks – How to Find and Fix Leaks in Compressed Air System
 Make Your Own Air Compressor Manifold – Manifold Buying Guide
 Air Compressor Quick-Connect Leaks – Why & How to Fix