Every good thing comes to an end, and of these things is the camping season. When winter comes upon us, one of the most important things you can do to protect your RV while it sat in storage is winterizing RV with air.
A more common way to winterize the RV is using antifreeze, but this can become messy, and so, this article will provide you with all the necessary information on winterizing RV with compressed air. Throughout the article, I will provide a number of useful YouTube demonstrations to help you better understand the processes!
Table of Contents
- Why Winterize RV With an Air Compressor?
- What Do I Need to Winterize RV With Air Compressor?
- How to Winterize RV With Air Compressor
- Important Considerations When Winterizing Your RV With Air Compressor
- How to Winterize Airstream With Air Compressor
- How to Winterize Trailer With Air Compressor
- FAQs (Frequently Asked Questions)
Why Winterize RV With an Air Compressor?
One of, if not the, most commonly used methods for winterizing an RV is by using RV-safe antifreeze. This method, however, can be significantly messy and unnecessary. Instead, you can skip all the mess and do the job with an air compressor. Let us discuss RV winterizing air vs antifreeze!
Pumping RV antifreeze into an RV’s water system is not ideal because you will have the issue of the RV antifreeze sitting in your RV’s entire plumbing system for months on end, on top of the unnecessary use of RV antifreeze and the plastic containers they come in. Of course, we use non-toxic antifreeze as it’s in our plumbing systems but why are we pumping gallons of it through our lines every year?
At the end of the winter season, you then have to reverse everything you’ve done, by de-winterizing the RV when the warmer weather returns. This process will require not only a lot of water, but a lot of time to ensure you thoroughly flush any residual antifreeze out of the system.
And thus, this is why you should opt for winterizing camper with compressed air. You need to select the right air compressor as you don’t want to introduce oil or other contaminants into the freshwater system. But, we’ll get into suitable air compressors shortly.

What Do I Need to Winterize RV With Air Compressor?
Before getting into the steps on how to winterize a travel trailer using air, I would like to provide the equipment you will need to be able to conduct the process. To winterize your camper with an air compressor, of course, you will need an air compressor before anything.
There are multiple air compressors readily available online, here are a couple of examples readily available on Amazon:
First up is the Viair 400P-RV automatic portable compressor kit which is an Amazon choice.
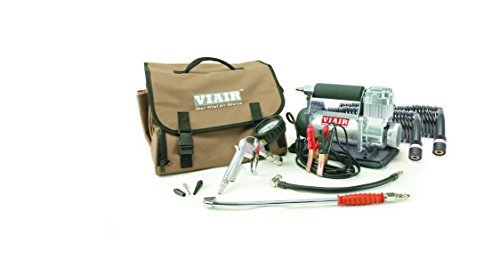
- 12 VOLT - 150PSI Max Working Pressure, engine must be running during use. Dimensions- 10.87 L x 5.83 W x 7.48 H inches
Prices pulled from the Amazon Product Advertising API on:
Product prices and availability are accurate as of the date/time indicated and are subject to change. Any price and availability information displayed on [relevant Amazon Site(s), as applicable] at the time of purchase will apply to the purchase of this product.
The second is this Viair 450P-RV automatic compressor kit which boasts terrific user reviews.

- 12 VOLT - 150PSI Max Working Pressure, engine must be running during use
Prices pulled from the Amazon Product Advertising API on:
Product prices and availability are accurate as of the date/time indicated and are subject to change. Any price and availability information displayed on [relevant Amazon Site(s), as applicable] at the time of purchase will apply to the purchase of this product.
Both these compressors are excellent options that are not only tankless but have built-in air filters to help prevent debris and contaminants from entering the system. These small but terrific compressors are great to have with your RV as they can not only help fill the huge high-pressured tires of the camper but also winterize the plumbing system when you plan to store the RV for the months through winter.
To be able to use this compressor to winterize RV water lines you will need a winterizing kit alongside it. These kits will typically include a blow-out adapter with a shut-off valve, a flexible hose, male and female connections, and quick connections.
Here are a couple of examples of RV winterizing kits that are readily available on Amazon:
The first kit below has a shut-off valve with a 3/4″ male and female garden hose connector to allow quick connections to your hoses to be able to winterize your RV.

- MULTIPURPOSE:The winterizing kit with shut off valve come with 3/4 male and female garden hose connector,When with male garden hose end is typically used to winterize recreational vehicles(RV), watercraft, garden hose, camper, boat and travel trailer. The fitting with female garden hose end is typically used to winterize sprinkler systems, garden hoses, and outdoor plumbing.
Prices pulled from the Amazon Product Advertising API on:
Product prices and availability are accurate as of the date/time indicated and are subject to change. Any price and availability information displayed on [relevant Amazon Site(s), as applicable] at the time of purchase will apply to the purchase of this product.
The second winterizing kit includes a blowout adapter with a shut-off valve, male & female quick-connect to help you blow out your RV plumbing systems.
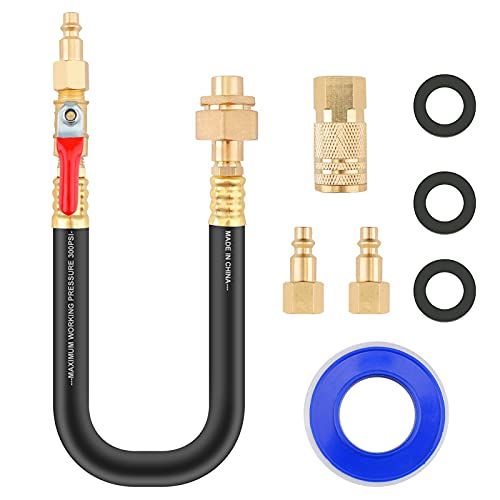
- 【Durable and Stronger】: This antifreeze tool is made of the highest quality parts. All metal parts are solid lead-free brass, providing extra strength and durability. The nominal diameter of the hose is 3/8 inch, it is a waterproof and oil-proof flexible reinforced synthetic rubber
Prices pulled from the Amazon Product Advertising API on:
Product prices and availability are accurate as of the date/time indicated and are subject to change. Any price and availability information displayed on [relevant Amazon Site(s), as applicable] at the time of purchase will apply to the purchase of this product.
In some situations, you may wish to have an adjustable air pressure regulator to control the pressure of the air, and buy it separately from the kit. Here is an example of an adjustable air pressure regulator readily available on Amazon.
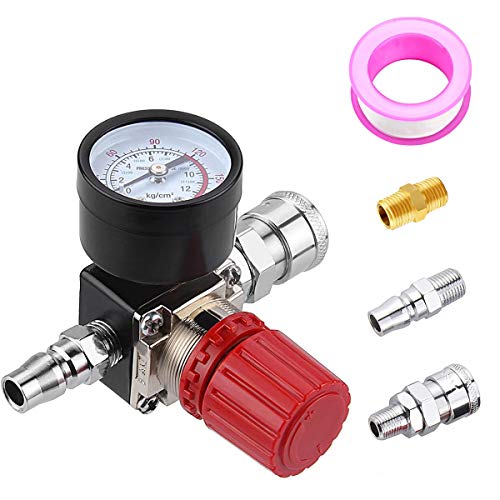
- Four Way Valve: This air pressure regulator has four holes. Three holes of 1/4 NPT and one hole for 1/8 NPT.
Prices pulled from the Amazon Product Advertising API on:
Product prices and availability are accurate as of the date/time indicated and are subject to change. Any price and availability information displayed on [relevant Amazon Site(s), as applicable] at the time of purchase will apply to the purchase of this product.
The final item you will need for winterizing your RV is RV-safe antifreeze. You will need this in a small amount for protecting your p-traps etc. Once you have gathered all these supplies, you will be able to winterize your RV for the winter season.
How to Winterize RV With Air Compressor
Let’s now walk through the steps required for winterizing camper water lines.
- Drain Tank and Lines
Begin by draining all tanks and lines completely of liquid.
- Open and Drain Faucets
Open all faucets in your RV and drain them through the sewer connection.
- Close Drains and Faucets
Close all drains and faucets once the bulk of the water is removed from the system.
- Set Proper PSI of Air Compressor
Set the PSI of the air compressor by installing a regulator after the trigger on the air compressor hose, this will ensure no damage is done to the RV’s plumbing system by too high pressure.
- Blow Air Out of Water Heater Lines
Clear the water in the lines going to the water heater using the air compressor until the water becomes a trickle and then bypass the water heater.
- Turn One Faucet on Warm and Blow Air
Blow air out of the hot water lines after opening the warm water at the faucet until no more water comes out the drain.
- Repeat with All Faucets, Showers, and Toilets
Repeat the same process with the cold water side and then for every faucet, shower, and toilet in your RV, as well as any outdoor connections.
- Follow Instructions for Appliances
Follow any instructions for winterizing your RV appliances like washing machines, dishwashers, etc.
- Pour Antifreeze Down Drains and Toilets
Pour antifreeze down the drains and to ensure that the water within the traps does not crack your drain pipes when winter the temperature drops.
Now let’s look at these steps in greater detail!
Drain Tank and Lines
The first step to being able to winterize RV water system is to drain all the water from your tanks and lines. Locate the low point drains on your water system and open them. You will need to have your RV connected to a sewer connection to empty the tanks and must wait for the tanks to clear completely, which may take some time for the liquids to leave the tanks and lines.
You must not forget to drain your water heater in the camper as well if you have one. I would recommend turning it off the night before so that the water is not scalding hot when you open it.
Open and Drain Faucets
Next, you should open and drain all the faucets in your RV. We do not need to use an air compressor at this point, we are simply letting gravity go to work and draining all faucets in bathrooms, kitchens, or water connections. Ensure that the RV plumbing system is connected to the sewer connection so that all the water is able to leave the system.
Any water that is left to remain in the system can cause a leak or even burst a pipe within the RV’s plumbing system. You should not rush these tasks, and instead, take your time throughout the whole process, ensuring you allow the faucets to drain thoroughly. The aim is to get as much of the water out of your camper’s lines as possible.
Close Drains and Faucets
Now that the bulk of the water has been removed from the RV system, close all the drains and faucets to help direct the airflow when you are to pump air from the compressor into the system.
Set Proper PSI of Air Compressor
You need to set the correct PSI of your air compressor or attached pressure regulator to ensure that the pressure is not unregulated or too high. If the pressure is too high, it’s extremely likely that you will cause damage to your system rather than winterizing it. You may notice initially, but when it comes to spring, you will discover problems too big to fix.
I would recommend a maximum pressure of 45 PSI to ensure that the pressure supplied by your air compressor does not exceed the allowed limits on your RV’s plumbing setup. You may need to even set it lower than 45 PSI, this will depend on your RV so please be sure to check.
To set the correct PSI, you can adjust the pressure regulator attached to your compressor. I would recommend attaching the adjustable pressure regulator after the trigger on the air compressor hose so that you can prevent the air compressor from running continuously.
Blow Air Out of Water Heater Lines
After the compressor’s PSI is set, plug the compressor into a power source and turn it on. You first want to clear the water in the lines that head towards the water heater. With the heater drain open and the pressure release valve closed, connect your air compressor to the line and begin blowing air into the system.
You will be able to see more water draining from the water heater and be able to hear the compressed air entering it. You should continue to blow air into the line until the water exiting the water heater becomes a trickle. This will allow you to clear all the water in the lines leading to the heater.
When the lines are clear, you can bypass the water heater. You must find access to the back of your water heater and then turn the valves so that no more water, or air for a matter of fact, is able to enter the heater. You may get lucky in that the valves are labeled “bypass” which will help speed you up!
Turn One Faucet on Warm and Blow Air
With the water heater now bypassed, it is time to blow air through and out of the hot water lines. It may be beneficial for you to have a second set of hands during this process, otherwise, you’ll be doing a lot of running back and forth.
How do I blow out the water lines on my RV? You should start by opening the warm water at a faucet and then blow the compressed air through the line. You’ll want to then continue to blow the air until you no longer see any water coming out of the drain! This is how to blow out water lines in RV.
Repeat with All Faucets, Showers, and Toilets
Close the warm water faucet and open the cold water side and use the air compressor to blow out the water of this side. I recommend leaving it open until there is no more water coming from the tap before turning it off when complete. After completing this, you have successfully winterized the faucet.
Therefore, you can now repeat this process for every faucet, shower, and toilet inside your camper. It’s important to not forget any outdoor kitchen faucets or outdoor shower connections even know you may use these less, they still need winterizing.
Follow Instructions for Appliances
I’ve provided guidance on the generic parts of an RV camper, but you must make sure you consult the instructions for winterizing other appliances in your RV. For instance, the washing machine, dishwasher, ice maker, and other devices may require specific steps to protect them through the cold winter months.
If you were not to take the proper precautions necessary then you may end up voiding your warranty. I advise contacting the manufacturer for clarification on anything you’re unsure about. One bad freeze in your RV could result in replacing several expensive appliances in your RV.
Pour Antifreeze Down Drains and Toilet
While this is an alternative method to putting antifreeze through your water lines, I recommend pouring some antifreeze down the drains and toilet. About a cup or two of RV antifreeze should be enough. The reason for this is that all drains have a trap that holds water to prevent smells from coming up from the tanks. These traps could have antifreeze in them otherwise they are likely to crack your drain pipes.
By implementing this final step, you will be able to keep the important pipes and tanks from freeing when the winter temperatures drop. You certainly do not want to start your camping season in spring with a busted or cracked tank.
Important Considerations When Winterizing Your RV With Air Compressor
The most important consideration to take when winterizing your RV with an air compressor is not rushing the process! The more you rush, the more likely you are to make a mistake that will lead to damage being caused and an unsuccessfully winterizing project.
Overlooking a water line, faucet, or drain leaves it unprotected and vulnerable to freezing temperatures. I’d recommend walking around your RV camper before starting the whole process and taking an inventory of all of the items in your system.
This will include outside showers, washing machine connections, black tank flushes, sink sprayers, water pumps, and your water heater. By creating yourself a checklist to run through, you should hopefully remove the chances of missing anything!
How to Winterize Airstream With Air Compressor
To winterize an Airstream with an air compressor you should begin by draining all the black and gray tanks. After this open all the faucets and allow them to drain through a sewer connection. After draining the faucets, close them so that you can blow compressed air into the lines and direct it through the system to remove any remaining water.
Blow air through and out of the water heater lines before going around each faucet and outside connection point ensuring you don’t miss anything. Be sure to follow any additional instructions for your washing machine, dishwasher, and other appliances. Finally, pour a cup or two of airstream antifreeze down drains and toilets.
How to Winterize Trailer With Air Compressor
To winterize your trailer with an air compressor you should begin with draining all the black and gray tanks on the trailer before opening all the faucets and allowing them to drain through the sewer connection.
Winterizing travel trailer with compressed air will then involve closing the faucets so that you can blow compressed air into the lines and direct it through the system to remove any remaining water in the plumbing setup.
Proceed to blow regulated compressed air through and out of the water heater lines before each faucet and outside connection point ensuring you don’t miss anything. Follow any additional instructions for your dishwasher and other appliances. Finish the winterizing of your trailer by pouring a cup or two of trailer antifreeze down the drains and toilets.
FAQs (Frequently Asked Questions)
To winterize an RV with compressed air you should first drain all the tanks and lines through a sewer connection before opening all the faucets and allowing them to also drain. Then close the faucets so that you can blow compressed air into the lines and direct it through the system to remove any remaining water from the lines. Proceed to blow air through and out of the water heater lines before going around each faucet and outside connection point ensuring you don’t miss any connections. Follow any further instructions for your appliances before finally, pouring a cup or two of RV antifreeze down the drains and toilets.
You don’t “need” an air compressor to winterize an RV as the more common method is pumping RV antifreeze into the RV’s water system. But, an air compressor can provide you with a better result, and save you from having to de-winterize the system after winter.
It is better to winterize a camper with compressed air rather than the more common method of RV-safe antifreeze. This is because the latter is incredibly messy and requires both time and lots of water to thoroughly flush any residual antifreeze out of the system when the warmer weather returns.
It is generally recommended to not exceed a pressure of around 45 PSI to winterize your camper. If you connect your air compressor to your plumbing system and it’s unregulated or too high of a PSI, you’ll likely do more damage than good. Some campers may require a maximum pressure of less than 45 PSI, so please check with the manufacturer before going ahead with anything.
If you have any questions regarding winterizing your RV, camper, trailer, or airstream, please leave a comment below, with a photo if applicable, so that someone can help you!