From time to time I get an exceptional post from folks visiting this site. Here’s one about putting a pressure switch back together. My visitor writes…
Problems putting a compressor pressure switch back together? It isn’t easy, but possible. This article will serve as a guide to repairing an air compressor pressure switch, which seems to be a common issue amongst air compressor users.
Table of Contents
- How to Fix an Air Compressor Pressure Switch & Re-Assemble
- General Step-by-Step Compressor Pressure Switch Assembly
- Reader Questions & Responses
- Alternative Compressor Pressure Switch Assembly Method
- How to fix an Air Compressor Pressure Switch that’s leaking & has bad electrical contacts
- How to put Campbell Hausfeld pressure switch back together again?
- Putting the Campell Hausfeld pressure switch back togetherby: Anonymous
- Putting the switch back togetherby: Bill
How to Fix an Air Compressor Pressure Switch & Re-Assemble
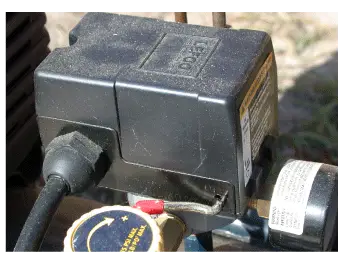
I had to repair my air compressor pressure switch because it was leaking at the diaphragm between the 4 port bases – I didn’t expect any real issues as I could tighten down the 4 bolts and it would be alright for a while. After looking into buying a new pressure switch and learning more about it, I figured I’d just try to fix my existing pressure switch.
I wish I had looked for any pics or diagrams that would show a breakdown of how the switch is laid out internally before I tried it though – I wouldn’t have messed with it as, despite extensive searching, there is nothing!
In hindsight, I could have just removed each of the 4 Allen bolts individually and added some Loctite and the pressure switch would have probably been fine.
So, if you’re one of the few who has taken one of these Lefoo-type pressure switches apart – the guy who posted on 8/8/14 (putting it back together) had some helpful info.
I have a 175 psi switch and didn’t realize the spring pressure would have been so great. I did not intend to take it all apart, but after removing the 4 Allen bolts, it separated from the base and I could not squeeze it back together, and trying to line up the bolt holes at the same time seemed impossible.
At one point, it basically flew apart. At first, it seemed like it could go back together 2 or 3 different ways, but after looking at it closer, it can only really go back together one way.
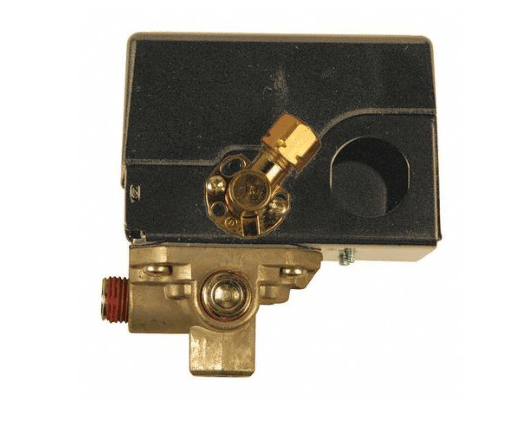
If you think repairing the pressure switch is too difficult or too much hassle, and you’d rather replace it. Visit our How To Replace An Air Compressor Pressure Switch guide!
General Step-by-Step Compressor Pressure Switch Assembly
Pressure Switch Assembly
- Adjust cut-in/cut-out springs
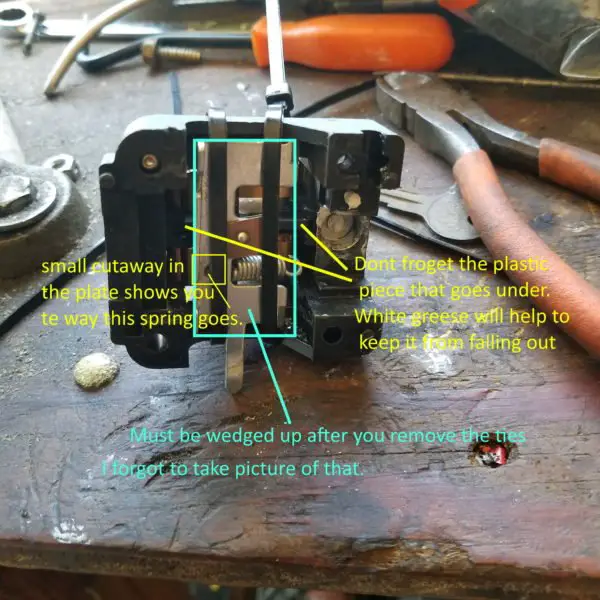
The first thing that I needed to do was to back out the cut-in/cut-out spring all the way. My adjustment screws were covered with silicone or something, so I had to remove that first but it was the gold screw (to the left) – I backed it all the way out so there was no tension.
- Slide the black flat piece
Then starting with the black flat plastic piece, there is a slot for it to slide up into, with a cut-out for the spring. The top of it should stick out between where the wires attach.
- Extent metal plate
Next, holding the main plastic body upside down, the metal plate with the tab that extends out to the unloader valve goes on, followed by the long metal plate with the round depression. There is a cut-out in the main plastic body for the 2 tabs of the metal plate to fit into. As the other guy had posted, leave the small spring between the 2 metal plates unhooked at this point.
- Line up parts on plastic body
Take the metal base, diaphragm, and 4 port section and line it all up on the main plastic body. After it is all bolted back together, take a small hook and stretch the small spring over the tab. It’s a pretty heavy spring for being so small, so it takes a bit of effort.
After it first flew apart, I figured I could find a breakdown of the switch easily online – but after relentless searching, I was sadly mistaken. I did find a few pics of people who were in the same boat with their switch in pieces…
Between looking at countless pics and trying to test fit it together several times – I was still a little uneasy I didn’t have it exactly right, but as I said, it can only really go back together one way. While it was a part, I found some corrosion on the metal base where it met the diaphragm – pretty much where it had been leaking – so I cleaned it all up.
Relieved to report that after putting the pressure switch back together and testing it out, it worked without issue and has not leaked at all. It’s taken some work to get the cutout set correctly, but other than that – the pressure switch is now working as it should.
I found this useful YouTube demonstration which may guide you through the process!
Reader Questions & Responses
Alternative Compressor Pressure Switch Assembly Method
by Bill Wolsleger
(Alberta, Canada)
Remove the 4 port base and switch from the compressor.
Loosen cut-out screw all the way back.
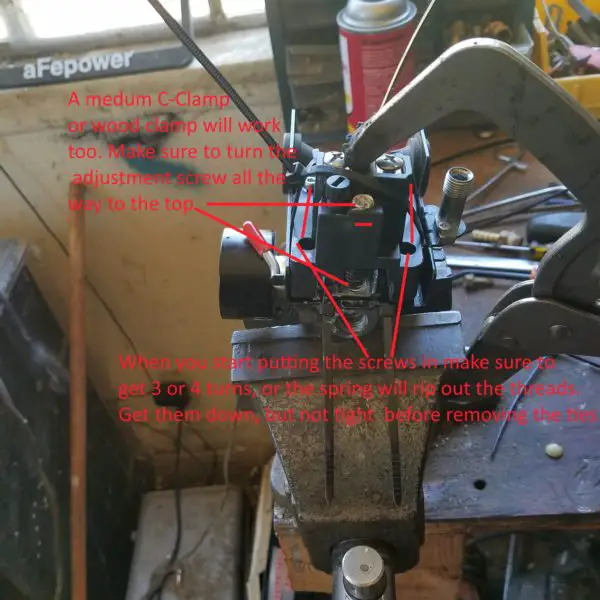
Clamp the black plastic switch upside down by itself in a vise.
Put the two metal pieces with the 2 springs in place loosely and slide the base plate into place until the base plate sets down flat into its position. This takes some effort as you are stretching the smaller spring while making sure the bigger spring stays put.
Hold the plate in its position and clamp it with needle nose vice grips to keep it in place.
Now put the 4 port base on the vice right side up with the black metal plate on top.
Put the black switch in its place with vice grips still clamping it. This will allow you to get 1 corner screw in.
I then put a large flat-blade screwdriver between the black metal plate and plastic switch to act as a wedge so that when I remove the vice grips the thing doesn’t fly apart again.
Pushing down on the switch I slowly slid the screwdriver out until everything was seated, then put the other 3 screws in.
Worked for me after a couple of tries.
Adjusted cutout to 110psi.
Very kind of you to contribute, Bill. Thanks.
How to fix an Air Compressor Pressure Switch that’s leaking & has bad electrical contacts
And a big thank you to Mark E Estrada, who provided the following.
It looks like lots of people are/were in the same boat as I was. I pride myself on being able to fix anything and have been a mechanic for 35 years. This was really tough and I even ordered a new switch because I was gonna give up, so here are some pictures I took because I got it back together and it works and doesn’t leak.
I did this because people on the internet have got me out of a bind a few times…pay it forward.
I took it apart because it leaked, and the points were peaked. Filing them helped a little. But sealing all the leaks so it doesn’t cut on and off all the time will make my repair last a little longer, and I have a new one, (not this brand) when it goes out.


Mark goes on to say “Good luck. You wouldn’t think a little switch would be such a b#@$ard, but it is. It would help if there was a diagram, but I couldn’t find one so I had to put it together like a puzzle. Plenty of videos putting one on! If you need to watch a video to do that, don’t try this. You will be wasting your time.”.

How to put Campbell Hausfeld pressure switch back together again?
by CARL LINSTROM
(BRADENTON, FL)
My Campbell Hausfeld compressor was starting very slowly each time it went to start back up.
Sometimes it would trip the thermal overload reset on the motor when it tried to restart.
I took off the top part of the pressure switch (Big Mistake I think!) and now can you show me how to put it back together?
Putting the Campell Hausfeld pressure switch back together
by: Anonymous
I made the same mistake, the same switch, and I managed to get it together again, the trick I used was to take the coiled spring off its anchor point which is right next to the green spring, and this removed tension on the parts for assembly.
I took no pictures. Of the process, so you will have to go the replacement almost alone, the black plastic part with spring goes in with the spring towards the green spring and the rounded “stem” towards the bottom of the switch, this rests against a copper.
The leaf spring on the metal bar that the aforementioned coil springs other end hooks to, leave the spring anchored on this part, notice the copper leaf spring goes against the plastic stem and the end of this bar protrudes out the side and is lined up with the air switch connected to the plastic airline.
These hints will put your parts in the proper orientation.
The next metal bar has a round indentation that goes down to contact the diaphragm, the end has two tabs that drop into the back of the plastic body, into slots molded for them, this acts as a hinge point for this bar,
Notice when oriented this way there is a tab or anchor point at the end towards the front of the large green spring, this is to anchor the end of the coil spring which you leave free to prevent tension on parts while reassembling,
After this, the metal case goes on with the air switch tab protruding through at the A/S mounting point.
The other side has the on-off switch lever, which goes through the case, and a slot molded in the plastic body in such a way that the wire lever tab forces the bar with the round diaphragm dent in it up to make contact when the lever is pushed down.
Assemble it in the off position to also prevent tension on parts, when the case is in position hold it assembled with one hand and place the diaphragm and the cast mounting block in place so all the screw holes align,
Hold all the parts together now and get the screws in and tight, after the unit is assembled use a homemade hook, dental probe, or needle-nose pliers to reach in alongside the green spring and grab the end of the coil spring and pull it out and hook it over its anchor tab on the metal bar.
I used pliers after trying a probe, but I finally got It over and the switch works or seems to.
I do have to adjust the “on” pressure which I messed with and I don’t know if the dag thing works until I have the compressor assembled but it does seem to, good luck.
Putting the switch back together
by: Bill
Wow, thanks for taking the time to write this.
I sure hope it helps folks out there that accidentally, or on purpose, disassembled their pressure switch and cannot reassemble it.
Good luck with that Carl.
And by the way, your compressor symptoms suggest the following as typical problems with air compressor starting.
1)unloader valve not working,
2)poor power supply to the motor circuit
3)start capacitor failing
If you have any questions regarding repairing or re-assembling an air compressor pressure switch, please leave a comment below, with a photo if applicable, so that someone can help you!